Explorer Panel - Navigation
The Explorer Panel Navigation system provides comprehensive file system interaction capabilities through sophisticated keyboard and mouse controls, advanced file selection methods, intelligent sorting options, and powerful search functionality. This detailed navigation framework enables efficient file management through multiple interaction paradigms including traditional keyboard-centric operation modes and modern graphical interface patterns that accommodate diverse user preferences and workflow requirements while maintaining optimal productivity and accessibility.
Comprehensive Navigation and Interaction System
Experience advanced file system navigation through flexible control schemes that support both Commander-Style keyboard-centric operation and Windows Explorer-Style graphical interaction. The Explorer Panel Navigation system provides sophisticated file selection capabilities, intelligent sorting options, powerful search functionality, and comprehensive clipboard integration for maximum productivity across all file management workflows.
Interface Operation Modes
Multi Commander supports two distinct interface operation modes that provide different interaction paradigms to accommodate user preferences and workflow requirements, with each mode optimizing specific aspects of file management efficiency.
Explorer Panel Interface Overview
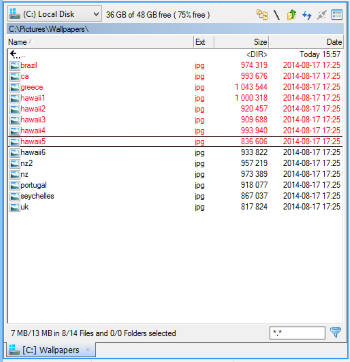
Explorer Panel showing file listing in detail mode with comprehensive navigation capabilities
Important Note
All keyboard and mouse commands referenced below assume the default Commander-Style setup unless otherwise specified.
Commander-Style Setup
Keyboard-Optimized Interface
- Norton Commander Heritage: Based on classic DOS-era file manager paradigms
- Keyboard Efficiency: Complete file management functionality accessible via keyboard
- Platform Adoption: Widely adopted across file managers on multiple platforms
- Productivity Focus: Optimized for rapid operation without mouse dependency
Key Characteristics
- Right-Click Selection: Right mouse button toggles file/folder selection
- Keyboard Navigation: Comprehensive arrow key and shortcut navigation
- Command Integration: Direct keyboard access to all file operations
- Efficiency Priority: Minimizes hand movement between keyboard and mouse
Windows Explorer-Style Setup
Familiar Windows Interface
- Windows Compatibility: Operates like standard Windows Explorer interface
- Left-Click Selection: Standard Windows file selection behavior
- Modifier Key Support: Ctrl and Shift for multi-selection operations
- Accessibility: Familiar to users transitioning from Windows Explorer
Trade-offs
- Efficiency Loss: Reduced keyboard-centric operation efficiency
- Mouse Dependency: Increased reliance on mouse for file operations
- Feature Limitations: Some advanced productivity features may be disabled
- Configuration Option: Can be enabled in Multi Commander settings
Configuration
See Windows Explorer-Style Setup for configuration details.
Sorting and File Organization
The Explorer Panel provides sophisticated sorting capabilities that enable efficient file organization through clickable column headers, keyboard shortcuts, and intelligent logical sorting options that handle numeric sequences naturally.
Column-Based Sorting System

Column header showing sort indicator arrow for ascending/descending order control
Interactive Sorting Controls
- Click Column Headers: Click any column header to sort by that attribute
- Sort Direction Toggle: Click again to reverse sort order (ascending/descending)
- Visual Indicators: Arrow in header shows current sort column and direction
- Multi-Column Support: Sort by name, size, date, type, or any displayed column
Keyboard Sorting Shortcuts
| Shortcut | Function |
|---|---|
| Ctrl+F1 | Sort by first column |
| Ctrl+F2 | Sort by second column |
| Ctrl+F3 | Sort by third column |
| Ctrl+F4 | Sort by fourth column |
| Ctrl+F5 | Sort by fifth column |
Logical Sorting Enhancement
Intelligent Numeric Sorting
When "Sort Files Logical" option is enabled in Explorer Panel settings, numeric subfields within filenames are treated as actual numbers rather than text, resulting in more intuitive sorting order.
Standard Text Sorting:
file_0011.txt
file_1.txt
file_10.txt
file_2.txt
Logical Numeric Sorting:
file_1.txt
file_2.txt
file_10.txt
file_0011.txt
Logical Sorting Benefits
- Natural Order: Files with numeric sequences sort in expected numerical order
- Version Management: Software versions (v1.2, v1.10, v1.3) sort correctly
- Sequential Files: Image sequences, document series maintain logical order
- User-Friendly: Matches human expectations for numeric file ordering
Advanced File Selection System
The Explorer Panel provides comprehensive file selection capabilities through multiple interaction methods, pattern-based selection tools, and persistent selection memory that accommodates diverse workflow requirements and operational preferences.
Selection Interface Overview
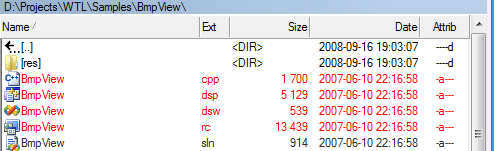
Explorer Panel showing multiple file selection with visual selection indicators
Selection Persistence
- Session Memory: Selected files remembered when returning to previously visited locations
- Navigation Persistence: Selections maintained during directory navigation within session
- Session Scope: Selection memory active until Multi Commander is closed
- Workflow Continuity: Enables complex multi-step file operations across locations
Mouse Selection (Commander-Style)
Right-Click Selection
- Toggle Selection: Right-click files/folders to select or deselect
- Drag Selection: Hold right button and drag to change selection on multiple items
- State Determination: First click determines whether to select or deselect during drag
- Continuous Operation: Drag across multiple items for rapid selection changes
Selection Rectangle
- Rectangle Selection: Drag rectangle in empty space to select multiple files
- Setting Requirement: Must enable "Selection Rectangle" in Explorer Panel Settings
- Outside Start: Must begin drag outside any file/folder name
- Area Selection: All items touched by rectangle become selected
Mouse Selection (Windows Explorer-Style)
Left-Click Selection
- Standard Selection: Left-click to select files/folders
- Range Selection: Hold Shift and click to select ranges
- Toggle Selection: Hold Ctrl to toggle individual items
- Windows Compatibility: Familiar behavior for Windows Explorer users
Modifier Key Combinations
- Shift+Click: Select range from previous selection to clicked item
- Ctrl+Click: Add/remove individual items without affecting other selections
- Multiple Ranges: Combine Shift and Ctrl for complex selection patterns
- Selection Preservation: Ctrl prevents clearing existing selections
Pattern-Based Selection
Expand/Shrink Selection by Filter
- Expand Selection: Num+ or Edit Menu "Select" - add files matching pattern
- Shrink Selection: Num- or Edit Menu "Unselect" - remove files matching pattern
- Filter Patterns: Use wildcards and complex patterns for precise selection
- Additive Operation: Expand adds to existing selection without clearing
Quick Selection Shortcuts
- Same Extension: Ctrl+Num+ selects files with same extension as focused file
- Same Name: Alt+Num+ selects files with same name but different extensions
- Deselect Matching: Ctrl+Num- and Alt+Num- for deselection
- Context-Sensitive: Operations based on currently focused file attributes
Keyboard Selection Controls
Global Selection Operations
- Select All: Ctrl+A or Edit Menu "Select All"
- Unselect All: Ctrl+D or Edit Menu "Unselect All"
- Invert Selection: Num* or Edit Menu "Invert Selection"
- Complete Control: Comprehensive selection management via keyboard
Interactive Selection Keys
- Toggle and Move: Insert key toggles selection and moves to next item
- Space Bar Toggle: Space toggles selection of focused item
- Folder Size Calculation: Space bar on folders also triggers size calculation
- Navigation Integration: Combine selection with movement for efficient workflows
Search and Navigation Features
The Explorer Panel integrates powerful search capabilities including Quick Search for rapid file location, Forward Keys functionality for command line integration, and comprehensive context menu support that enhances navigation efficiency and operational flexibility.
Quick Search Functionality
Instant File Location
- Commander-Style: Hold Alt+Ctrl while typing filename
- Explorer-Style: Simply start typing without modifier keys
- Focus Movement: Automatically moves focus to matching files/folders
- Progressive Matching: Refines search as you continue typing
Search Navigation
- Next Match: Down Arrow while Quick Search window is active
- Previous Match: Up Arrow while Quick Search window is active
- Multiple Matches: Navigate through all files matching current search
- Search Window: Visual feedback showing current search term
Configuration Options
- Activation Methods: Configure trigger keys in Explorer Panel settings
- Alt+Ctrl+Letter: Traditional commander-style activation
- Alt+Letter: Simplified activation method
- Any Letter: Direct typing activation (disables Forward Keys)
Forward Keys Integration
Command Line Integration
- Automatic Forwarding: Key presses forwarded to command line bar in Commander-Style
- Direct Command Entry: Start typing commands without changing focus manually
- Workflow Efficiency: Seamless transition from file browsing to command execution
- Focus Management: Eliminates need to manually activate command line
Manual Focus Control
- Force Focus: � key changes input focus to command line bar
- Keyboard Layout: Key position varies by language/layout (left of '1' key)
- Laptop Variations: May differ on laptop keyboards
- Customizable: Key assignment configurable in keyboard customization manager
Feature Interaction
- Quick Search Conflict: Forward Keys disabled when Quick Search uses "any letter"
- Mode Selection: Choose between Quick Search and Forward Keys functionality
- Configuration Trade-off: Enable Quick Search or Forward Keys, not both
- Workflow Preference: Select based on primary usage pattern
Context Menu System
Adaptive Context Menus
- Windows Integration: Standard Windows Explorer right-click context menu
- Multi Commander Extensions: Additional actions and Multi Commander-specific options
- Mode-Dependent Access: Different activation methods based on interface style
- Context Sensitivity: Menu contents adapt to selected files/folders
Access Methods
- Explorer-Style: Right mouse button immediately shows context menu
- Commander-Style: Hold right button for 2 seconds to show menu
- Double Right-Click: Double right-click also displays context menu
- Selection Conflict: Right-click primary function is selection in Commander-Style
Drag and Drop Operations
File Transfer Operations
- Left Mouse Button: Drag selected files using left mouse button
- Same Drive Default: Files dropped on same drive default to Move operation
- Cross Drive Default: Files dropped on different drives default to Copy operation
- Operation Override: Hold Shift while dropping to force specific operation
Drag and Drop Behavior
- Visual Feedback: Drag cursor indicates operation type (copy/move)
- Drop Target Highlighting: Valid drop zones highlighted during drag
- Modifier Keys: Control operation type through keyboard modifiers
- Cross-Panel Support: Drag between left and right Explorer Panels
Clipboard Operations and Integration
The Explorer Panel provides comprehensive clipboard integration that extends standard Windows copy/paste functionality with specialized path copying features, intelligent content detection, and advanced paste capabilities for various data types including paths, images, and text content.
Advanced Copy Operations
Path Copying Shortcuts
| Shortcut | Function |
|---|---|
| Ctrl+P | Copy complete path with filename |
| Ctrl+Shift+P | Copy only filename(s) |
| Shift+Alt+P | Copy only path without filename |
Copy Operation Benefits
- External Integration: Paste paths into other applications and documents
- Flexible Options: Choose specific path components based on needs
- Multiple Files: Works with multiple selected files/folders
- Workflow Enhancement: Rapid path sharing between applications
Intelligent Paste Operations
Path Navigation
- Path Paste: Ctrl+V with file/folder path in clipboard
- Automatic Navigation: Explorer Panel navigates to pasted path location
- Continued Browsing: Resume file management from pasted location
- Path Validation: Automatic verification of pasted path validity
Content Type Detection
- Intelligent Detection: Multi Commander identifies clipboard data type
- Image Content: Screen captures and image data detected automatically
- Text Content: Text data identified for file creation
- Format Options: Choose appropriate file format for content type
Advanced Content Handling
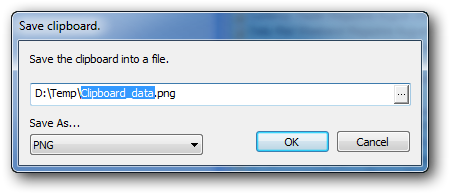
Save Clipboard dialog showing image format options for screen captures and image content
Image Content Handling
- Image Detection: Automatic detection of image data (screen captures, copied images)
- Format Selection: Choose from BMP, JPG, or PNG output formats
- Save Dialog: Interactive dialog for filename and format selection
- Quality Control: Format-specific options for optimal image saving
Text Content Handling
- Text Detection: Automatic identification of text content in clipboard
- Encoding Options: Save as ASCII or Unicode text files
- File Creation: Direct creation of text files from clipboard content
- Format Preservation: Maintain text formatting and encoding as appropriate
Workflow Integration
- Screen Capture Workflow: Take screenshot, paste to save directly as image file
- Text Collection: Copy text from applications, save as files for processing
- Content Organization: Transform clipboard content into organized file system resources
- External Integration: Bridge between applications and file system organization
Favorites and Bookmarks System
Multi Commander provides multiple sophisticated bookmark and favorites systems that enable rapid access to frequently used locations through various interface components and customizable shortcut mechanisms tailored to different workflow preferences and operational patterns.
Favorites Implementation Methods
Available Bookmark Systems
- User Defined Command in Button Panel: Visual buttons for frequently accessed locations
- Alias for Command Line Field: Text shortcuts for keyboard-centric navigation
- User Command in Menu Bar: Menu-integrated location shortcuts
- Quick Launch Bar: Drag-and-drop location shortcuts
- Favorites Window: Dedicated favorites management interface
- Quick Paths: Rapid path access system
Button Panel Integration
Visual Location Shortcuts
- Wizard Mode Activation: Enable Wizard Mode for easy button creation
- Drag-and-Drop Setup: Drag folders to buttons for instant location shortcuts
- Visual Interface: Click buttons to navigate to stored locations
- Custom Configuration: Configure buttons through Button Panel Wizard dialog
Setup Process
- Enable Wizard: Press "Wizard Mode (On/Off)" button or configuration menu
- Red Background: Wizard mode indicated by red background around buttons
- Drag Target: Drag file/folder to any button position
- Dialog Selection: Choose "Go to file / path in Multi Commander" option
Command Line Aliases
Keyboard-Centric Shortcuts
- Text Shortcuts: Type alias name in command line to navigate
- Manual Creation: Use Alias Editor under Configuration menu
- Quick Commands: "alias" and "alias2" commands for rapid creation
- Efficient Navigation: Ideal for keyboard-focused workflows
Alias Creation Examples
alias mp3="d:\my music\mp3\"
alias2 mp3
Creation Methods
- Alias Command:
alias name="full path"for explicit path definition - Alias2 Command:
alias2 nameuses current panel path - Path Quotes: Required only when paths contain spaces
- Instant Access: Type alias name and press Enter to navigate
Detailed Information
See Aliases Documentation for comprehensive alias management.
Menu Bar Integration
User Defined Commands
- MC.Explorer.GoTo Command: Core command for location navigation
- Parameter Options: PATH, LEFT, RIGHT for specific panel targeting
- Menu Integration: Add commands to menu bar after creation
- Organized Access: Group location shortcuts in menu structure
Command Example
MC.Explorer.GoTo PATH="D:\My Music\MP3"
Advanced Options
- Panel Targeting: Use LEFT/RIGHT instead of PATH for specific panel control
- Menu Organization: Create hierarchical menu structures for location groups
- Command Saving: Save and access through Menu button
- Integration Benefits: Consistent with Multi Commander's command system
Detailed Coverage
See User Defined Commands for complete functionality.
Quick Launch Bar
Drag-and-Drop Shortcuts
- Direct Drag-and-Drop: Drag files and folders directly to Quick Launch Bar
- Folder Navigation: Click folders on Quick Launch Bar to navigate
- User Command Integration: Right-click to insert User Defined Commands
- Visual Access: Immediate visual access to favorite locations
Integration Benefits
- Mixed Content: Combine folders, files, and commands on same bar
- Workflow Integration: Part of main interface for constant access
- Easy Setup: No configuration required for basic folder shortcuts
- Command Extension: Enhanced with User Defined Commands for advanced functionality
Comprehensive Guide
See Quick Launch Bar for detailed configuration options.
Complete Keyboard Shortcuts Reference
The Explorer Panel supports extensive keyboard shortcuts for all navigation, selection, and file management operations, enabling complete functionality access through keyboard-only interaction for maximum efficiency and accessibility.
Comprehensive Keyboard Reference
Complete Shortcut Documentation
- Commander-Style Shortcuts: Default Keyboard Shortcuts (Commander style setup)
- Explorer-Style Shortcuts: Default Keyboard Shortcuts (Windows Explorer style setup)
- Context-Sensitive: Different shortcuts available based on selected interface style
- Customizable: All shortcuts can be modified through keyboard customization manager
Key Navigation Categories
- File System Navigation: Directory movement, sibling navigation, panel synchronization
- Selection Operations: Pattern-based selection, range selection, inversion operations
- File Operations: Copy, move, delete, rename through keyboard shortcuts
- Interface Control: Panel management, view switching, component toggling
Hover Data Preview
The Hover Data Preview feature shows a quick summary of file content or metadata without opening the file in a separate viewer.
Quick File Preview
How to Use
- Press Alt+Q on a file in the panel to show a hover data preview of the file
- The preview displays a summary of the file content or key metadata inline, without opening a separate viewer window
- Useful for quickly inspecting text files, images, and other files without switching away from the panel
Explorer Panel Navigation Mastery
Master Explorer Panel Navigation by understanding the fundamental differences between Commander-Style and Windows Explorer-Style operation modes, utilizing advanced navigation features like sibling folder navigation and panel synchronization, leveraging comprehensive selection methods including pattern-based selection and keyboard shortcuts, and integrating Quick Search and clipboard operations for maximum efficiency. Remember that Multi Commander's navigation system scales from basic file browsing to sophisticated multi-panel workflows through consistent keyboard and mouse interaction paradigms that adapt to your preferred working style.
Related Navigation Documentation
Enhance your navigation expertise with related Explorer Panel features: Explorer Panel Overview, Explorer Panel Layout, Path Field, File Selection, Keyboard Customization, Aliases, User Defined Commands, and Favorites.