Explorer Panel - Layout
The Explorer Panel Layout provides a comprehensive interface design that combines familiar file manager concepts with advanced productivity features through a sophisticated arrangement of specialized components. This detailed layout system integrates multiple interface elements including device access tools, navigation controls, file display areas, and filtering capabilities into a cohesive workspace that maximizes efficiency while maintaining intuitive operation for users familiar with traditional file management interfaces.
Comprehensive Interface Architecture
Experience a thoughtfully designed interface that combines essential navigation tools, advanced filtering capabilities, comprehensive status information, and customizable display options. The Explorer Panel Layout strategically positions all components for optimal workflow efficiency while providing extensive customization options to match individual preferences and operational requirements.
Explorer Panel Layout Overview
The Explorer Panel layout consists of ten strategically positioned interface components that work together to create an efficient file management environment. Each numbered component serves specific functional roles while maintaining visual harmony and logical workflow progression throughout the interface.
Complete Layout Structure
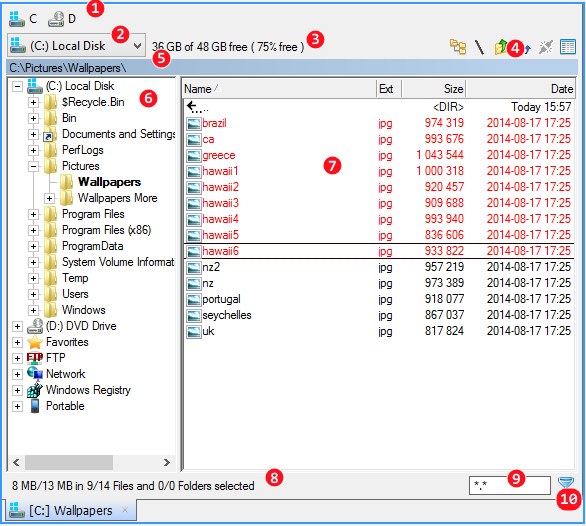
Complete Explorer Panel layout showing all interface components with numbered references
Interface Component Organization
The Explorer Panel layout is organized into functional groups that provide comprehensive file management capabilities:
- Device Access (1-2): Device toolbar and dropdown for storage navigation
- Navigation Tools (3-5): Free space display, command buttons, and path field
- Content Areas (6-7): Optional folder tree and primary file list view
- Status & Filtering (8-10): Selection status, view filters, and quick filter controls
Customization Capabilities
- Configurable Components: Most interface elements can be enabled/disabled in Explorer Panel Settings
- Layout Flexibility: Adapt the interface to match specific workflow requirements
- Visual Optimization: Customize appearance and behavior for optimal productivity
- Workflow Integration: Configure components to support specific file management patterns
Device Access Components (1-2)
The device access components provide comprehensive navigation capabilities for accessing various storage devices, network locations, and virtual file systems through both toolbar buttons and dropdown selections that support rapid device switching and location access.
1. Device Toolbar
Drive-Focused Access
- Drive Display: Shows buttons for available physical and logical drives
- Simplified Access: Quick one-click access to frequently used storage devices
- Drive-Only Focus: Displays drives only, unlike global toolbar that includes special folders
- Visual Consistency: Similar to global device toolbar but Explorer Panel-specific
Configuration Control
- Explorer Panel Settings: Enable/disable through "Drive buttons" option
- Space Management: Show/hide based on workflow requirements
- Customizable Display: Adapt toolbar presence to interface preferences
- Workflow Optimization: Configure based on drive access frequency
2. Device Dropdown List
Comprehensive Device Access
- Complete Device List: Shows all drives, special folders, and virtual devices
- Immediate Navigation: Select item to instantly navigate to that location
- Keyboard Shortcuts: Press drive letter (e.g., "E") for rapid access
- New Tab Support: Hold Shift while selecting to open in new tab
Advanced Features
- Extended Locations: Configure which special location types appear in settings
- Keyboard Navigation: Alt+F1 (left panel) or Alt+F2 (right panel)
- Flexible Configuration: Control extended location type visibility
- Rapid Access: Optimized for quick device and location switching
Quick Access
Use Alt+F1 (left) or Alt+F2 (right) to show device dropdown, then press drive letter for instant access.
Navigation Tools and Information (3-5)
The navigation tools section provides essential information display, command access, and path management capabilities that enable efficient navigation and provide critical system information for informed file management decisions.
3. Free Space Area
Storage Information
- Available Space: Shows free space on current drive or volume
- Total Capacity: Displays total volume capacity where applicable
- Percentage Display: Shows percentage of total capacity available
- Usage Monitoring: Essential for storage management and planning
Interactive Features
- Double-Click Toggle: Switch between showing available and used space
- Default Configuration: Set preferred display in Explorer Panel Settings
- Real-Time Updates: Automatically updates as space usage changes
- Setting Path: Configuration → Explorer Panel Settings → Layout → GUI Components
4. Command Buttons
Essential Navigation Commands
- Folder Tree: Alt+Num* - Split panel to show folder tree
- Go To Root: Ctrl+Back - Navigate to device root (\)
- Go Up: Back - Move to parent directory level
- Refresh/Reload: Force refresh; Ctrl+click for cache flush
Advanced Operations
- Disconnect: Safely remove USB drives or disconnect FTP connections
- View Mode: Switch between Details, List, Thumbnail List, and Thumbnail Details
- Active Panel Focus: Commands affect only the currently active Explorer Panel
- Keyboard Integration: Full keyboard shortcuts for rapid operation
5. Path Field

Path field showing current location with clickable path segments
Interactive Path Navigation
- Current Path Display: Shows current Explorer Panel location
- Clickable Segments: Click any subfolder in path for instant navigation
- Path Navigation: Direct path editing and navigation capabilities
- Advanced Features: Comprehensive options and specialized functionality
Detailed Information
See Path Field Documentation for comprehensive feature coverage.
Content Display Areas (6-7)
The content display areas provide the primary file browsing and navigation interfaces through optional folder tree organization and comprehensive file listing capabilities that form the core of the file management experience.
6. Folder Tree
Hierarchical Navigation
- Optional Display: Toggle folder tree visibility based on workflow needs
- Split Panel View: Shows folder tree in left portion when enabled
- Hierarchical Organization: Visual representation of directory structure
- Quick Navigation: Direct access to any visible folder in hierarchy
Integration Features
- Synchronized Navigation: Tree selection synchronizes with file list view
- Expandable Structure: Expand/collapse directory branches as needed
- Context Integration: Full integration with Explorer Panel operations
- Keyboard Control: Complete keyboard navigation support
Detailed Coverage
See Folder Tree Documentation for complete functionality details.
7. File List View
Primary File Display
- Main Interface: Primary area for file and folder display and interaction
- Multiple View Modes: Details, List, Thumbnail List, and Thumbnail Details
- Selection Support: Advanced file selection capabilities with multiple methods
- File Operations: Direct interaction for all file management operations
Display Capabilities
- Customizable Columns: Add, remove, and rearrange information columns
- Sorting Options: Sort by any column with ascending/descending order
- Visual Feedback: Clear indication of selection, focus, and operation states
- Context Menus: Full right-click context menu integration
Status Information and Filtering (8-10)
The bottom region provides comprehensive status information and powerful filtering capabilities that enhance file management efficiency through detailed selection statistics and flexible view filtering options for managing large directories.
8. Selection Status Bar

Selection status bar showing comprehensive file and folder statistics
Comprehensive Status Information
- 1 - Select/Total Size: Size of selected files/folders and total size of all visible items
- 2 - Selected/Total Files: Number of selected files and total visible files
- 3 - Selected/Total Folders: Number of selected folders and total visible folders
- 4 - Hidden Files/Folders: Count of items hidden by current view filter
Real-Time Updates
- Dynamic Information: Updates automatically as selection changes
- Size Calculations: Includes folder sizes when configured to display
- Filter Awareness: Shows impact of current view filter on display
- Selection Context: Provides immediate feedback for file operations
9. View Filter

View filter field for file and folder filtering
Advanced Filtering Capabilities
- Pattern Filtering: Use wildcards to show/hide specific file types
- Exclusion Filters: Prefix with "-" to exclude files (e.g., -*.jpg)
- Folder Targeting: Prefix with "/" to target folders only (e.g., -/backup)
- Keyboard Access: Ctrl+F for direct filter editing
Filter Examples
| Filter | Result |
|---|---|
*.* -*.jpg |
Show all files except .jpg files |
*.* -/backup |
Do not show the "backup" folder |
*.jpg *.tiff |
Show only jpg and tiff files |
Command Integration
View filters can be changed programmatically using Custom Commands.
10. Reset Filter and Quick Filters

Filter reset button and quick filter access
Quick Filter Management
- Toggle Functionality: Click to toggle current quick filter on/off
- Right-Click Menu: Access predefined set of quick filters
- Filter Customization: Select "Customize..." to edit filter list
- Rapid Access: Instant application of common filter patterns

Quick filter popup menu with predefined filters and customization options
Filter Organization
- Predefined Filters: Common filter patterns readily available
- Custom Filter Lists: Create and maintain personalized filter collections
- Quick Reset: Instant removal of all active filters
- Workflow Optimization: Streamline repetitive filtering operations
Essential Keyboard Shortcuts
The Explorer Panel Layout supports comprehensive keyboard control for efficient navigation and operation without requiring mouse interaction, enabling rapid file management through integrated keyboard shortcuts.
Layout Component Shortcuts
| Component | Shortcut | Function |
|---|---|---|
| Device Dropdown | Alt+F1/F2 | Show device dropdown (left/right panel) |
| Folder Tree | Alt+Num* | Toggle folder tree display |
| Go To Root | Ctrl+Back | Navigate to device root |
| Go Up | Back | Move to parent directory |
| View Filter | Ctrl+F | Edit view filter |
| Refresh | Ctrl+R | Force refresh (with cache flush) |
Explorer Panel Layout Mastery
Master the Explorer Panel Layout by understanding how each numbered component contributes to efficient file management workflows. Utilize device access tools for rapid location switching, leverage command buttons and path fields for precise navigation, optimize content display through folder tree and view modes, and harness status information and filtering capabilities for managing large directories. Remember that most interface components are configurable, enabling you to create the optimal layout for your specific workflow requirements.
Related Explorer Panel Documentation
Explore detailed functionality for specific layout components: Path Field, Folder Tree, Customize Columns, Customize Column Layouts, File Coloring, File Selection, and Custom Commands.