Explorer Panel - Customize Column Layouts
The Explorer Panel Customize Column Layouts system provides comprehensive control over column configuration management through a sophisticated dialog interface that enables users to create, modify, and organize specialized column arrangements for different file types and workflow requirements. This advanced customization framework supports detailed column property configuration, intelligent auto-loading based on directory paths, and complete layout management capabilities that transform the Explorer Panel into a powerful information display system tailored to specific operational contexts and file management scenarios.
Advanced Column Layout Management System
Experience comprehensive column layout control through a sophisticated customization dialog that provides access to hundreds of file information columns, detailed property configuration, intelligent auto-loading capabilities, and complete layout management. The Customize Column Layouts system enables creation of specialized information displays that automatically adapt to different directories and file types while supporting rapid layout switching for optimal productivity across diverse file management workflows.
Column Layout Customization Overview
The Customize Column Layouts dialog provides comprehensive access to advanced column management capabilities through a numbered interface that enables precise control over every aspect of column display, arrangement, and behavior within the Explorer Panel system.
Customization Dialog Access
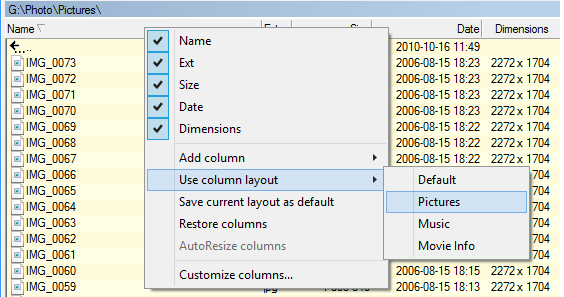
Column header context menu showing "Customize columns..." option for accessing advanced layout management
Dialog Access Method
- Context Menu Access: Right-click any column header and select "Customize columns..."
- Comprehensive Interface: Opens full customization dialog with complete column management capabilities
- Advanced Features: Access to features not available through quick context menu options
- Layout Creation: Create, modify, and organize custom column layouts
Dialog Interface Structure

Complete Customize Column Layouts dialog showing numbered interface components for comprehensive layout management
Numbered Interface Components
- 1. Column Layouts: Layout selection and management
- 2. Column Layout Name: Custom layout naming
- 3. Available Columns: Complete column library
- 4. Column Filter: Search and filter columns
- 5. Add Column: Column addition controls
- 6. Columns List: Current layout columns
- 7. Modify Column Order: Arrangement controls
- 8. Copy Column Layout from: Template copying
- 9. Column Properties: Detailed configuration
- 10. Autoload on Path: Automatic application
- 11. Save Changes: Configuration persistence
Layout Management and Naming (1-2)
The layout management section provides fundamental controls for creating, selecting, and organizing column layouts through dropdown selection and custom naming capabilities that enable comprehensive layout organization and identification.
1. Column Layouts
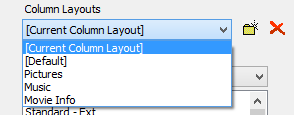
Column layout dropdown showing available layouts and management buttons
Layout Selection and Management
- Dropdown List: All available column layouts listed for selection
- Create New Button: Create new custom column layouts
- Delete Button: Remove existing layouts (except system layouts)
- Layout Switching: Select different layouts to modify or review
Special Layout Types
- [Current Column Layout]: Temporary layout representing active panel state
- [Default] Layout: Standard layout applied to all new Explorer Panels
- Session Scope: Current layout changes not saved between restarts
- Global Impact: Default layout changes affect all Explorer Panel tabs
2. Column Layout Name
Layout Identification
- Custom Naming: Enter descriptive names for new column layouts
- Menu Integration: Layout names appear in "Use Column Layout" submenu
- Identification System: Clear naming for easy layout recognition
- Context Menu Display: Names shown when right-clicking column headers
Naming Best Practices
- Descriptive Names: Use names that clearly indicate layout purpose
- File Type Reference: Include file type or use case in name
- Project Context: Reference specific projects or workflows
- Functional Description: Indicate layout's specialized information display
Example Layout Names
- "Development Projects": For source code and development files
- "Media Management": For image and video file collections
- "Document Archive": For document organization and review
- "System Administration": For system file management tasks
Column Operations and Management (3-7)
The column operations section provides comprehensive tools for discovering, adding, organizing, and configuring columns within layouts through filtering capabilities, addition controls, and detailed arrangement management that enables precise column customization.
3. Available Columns
Complete Column Library
- Comprehensive List: All available columns displayed for selection
- Category Filtering: Dropdown list to limit columns by type
- Extensive Options: Hundreds of file information columns available
- Type Organization: Columns organized by file attributes and metadata
Column Categories
- Basic Information: Name, size, date, attributes
- File System: Path, drive, permissions, ownership
- Media Metadata: Image dimensions, audio properties, video information
- Document Properties: Author, creation software, document statistics
4. Column Filter
Intelligent Column Discovery
- Search Functionality: Filter available columns by name or description
- Real-Time Filtering: Available columns list updates as you type
- Partial Matching: Shows columns whose names contain typed text
- Efficient Discovery: Quickly locate specific columns in extensive library
Filter Usage Examples
- "size": Shows all size-related columns (file size, folder size, etc.)
- "date": Displays all date-related columns (created, modified, accessed)
- "image": Reveals image-specific metadata columns
- "audio": Shows audio file property columns
5. Add Column
Column Addition Process
- Arrow Button: Press to add selected column to current layout
- Selection Required: Must select column from available list first
- Immediate Addition: Column added to layout columns list instantly
- Order Placement: New columns added at end of current list
Addition Workflow
- 1. Select: Choose column from available list
- 2. Add: Click arrow button to add to layout
- 3. Configure: Adjust properties if needed
- 4. Position: Use order controls to arrange
6. Columns List
Current Layout Columns
- Layout Display: Shows all columns assigned to currently selected layout
- Order Representation: Column order in list matches Explorer Panel display order
- Visual Organization: Clear representation of layout structure
- Selection Support: Select columns for property modification or removal
List Management
- Column Selection: Click columns to select for property editing
- Order Visualization: See exact display order for Explorer Panel
- Property Context: Selected column properties shown in properties section
- Removal Support: Selected columns can be removed from layout
7. Modify Column Order
Column Arrangement Controls
- Up Arrow: Move selected column up in display order
- Down Arrow: Move selected column down in display order
- X Button: Remove selected column from layout
- Precise Control: Fine-tune column positioning for optimal layout
Order Management Process
- 1. Select: Choose column to move in columns list
- 2. Position: Use up/down arrows to adjust position
- 3. Verify: Check order in columns list
- 4. Remove: Use X button to delete unwanted columns
Advanced Configuration Features (8-9)
The advanced configuration section provides sophisticated tools for layout templating and detailed column property management that enable precise control over display characteristics and layout inheritance for optimized information presentation.
8. Copy Column Layout From...
Layout Template System
- Template Selection: Choose existing layout to copy as starting point
- All Layouts Available: Dropdown lists all available layouts for copying
- Efficient Creation: Start with similar layout instead of building from scratch
- Configuration Inheritance: Copies columns, properties, and arrangements
Template Usage Scenarios
- Variation Creation: Create specialized versions of existing layouts
- Project Adaptation: Adapt general layouts for specific project requirements
- Incremental Development: Build complex layouts through iterative copying and modification
- Standardization: Create consistent layouts across different use cases
9. Column Properties
Detailed Column Configuration
- Display Name: Custom text shown in Explorer Panel column header
- Width: Default column width (subject to auto-fit settings)
- Margin Left/Right: Extra blank space around column content
- Column Alignment: Content alignment (left, right, center)
Property Configuration Process
- Column Selection: Select column in columns list to edit properties
- Property Modification: Adjust display name, width, margins, alignment
- Update Button: Press "Update" to apply property changes
- Visual Preview: Properties affect Explorer Panel display immediately
Update Requirement
Always press the "Update" button after changing properties to ensure modifications are applied to the layout.
Automation and Persistence (10-11)
The final configuration section provides intelligent automation capabilities and essential persistence controls that enable automatic layout application based on directory context and ensure configuration changes are permanently saved for future use.
10. Autoload on Path
Intelligent Layout Automation
- Path-Based Application: Automatically apply layout when browsing specified directories
- Subpath Support: Option to apply layout to all subdirectories under specified path
- Workflow Automation: Eliminate manual layout switching for predictable contexts
- Context-Sensitive Display: Specialized layouts automatically applied where most useful
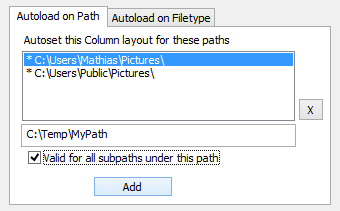
Add new autoload path with subpath option configuration
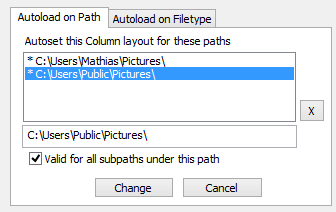
Modify existing autoload path settings and subpath configuration
Autoload Configuration Process
- Path Entry: Enter directory path where layout should automatically apply
- Subpath Option: Check "Valid for subpaths under this path" for recursive application
- Add Button: Press "Add" to save autoload configuration
- Asterisk Indicator: Paths with asterisk (*) prefix have subpath option enabled
Path Management
- Modification: Double-click any path in list to modify settings
- Path Changes: Update path location or subpath settings as needed
- Change Button: Click "Change" to apply modifications
- Removal: Select path and press X button to remove autoload rule
11. Save Changes
Configuration Persistence
- Save Changes Button: Essential final step to preserve all layout modifications
- Complete Persistence: Saves all changes made to selected column layout
- Loss Prevention: Without saving, all changes will be lost when dialog closes
- Session Scope: Changes only take effect after successful saving
What Gets Saved
- Column Selection: All added and removed columns in layout
- Column Order: Arrangement and positioning of columns
- Column Properties: Display names, widths, margins, alignment settings
- Autoload Rules: Path-based automatic application settings
Critical Save Requirement
You must press the "Save Changes" button to preserve modifications. All changes made in the dialog will be permanently lost if this button is not pressed before closing the dialog.
Practical Workflow Examples
Understanding practical applications of column layout customization through real-world scenarios that demonstrate how the numbered interface components work together to create efficient, specialized file management configurations for various operational contexts.
Photo Management Layout
Configuration Process
- 1-2: Create new layout named "Photo Management"
- 3-4: Filter for "image" columns and select metadata columns
- 5-6: Add dimensions, camera model, ISO, focal length columns
- 7: Arrange columns with filename first, then technical details
- 9: Set image dimension columns to center alignment
- 10: Configure autoload for photo directories (e.g., "D:\Photos")
- 11: Save changes to preserve configuration
Development Project Layout
Configuration Process
- 1-2: Create new layout named "Development Files"
- 8: Copy from "Default" layout as starting point
- 3-5: Add file version, line count, and encoding columns
- 6-7: Organize with filename, size, modified date, file type
- 9: Configure narrow width for size column
- 10: Set autoload for source code directories
- 11: Save comprehensive development layout
Column Layout Customization Mastery
Master Explorer Panel column layout customization by understanding how the numbered interface components work together to create sophisticated information displays. Use layout management (1-2) for organization, column operations (3-7) for content selection and arrangement, advanced features (8-9) for templating and property configuration, and automation controls (10-11) for intelligent application and persistence. Remember that the filter functionality (4) is essential for discovering relevant columns in the extensive library, property configuration (9) requires pressing "Update" to apply changes, and saving (11) is critical to preserve all modifications. Create specialized layouts for different file types and workflows, then use autoload paths to automatically apply appropriate layouts for optimal information display.
Related Column Management Documentation
Enhance your column customization expertise with related Explorer Panel features: Customize Columns, Explorer Panel Layout, Explorer Panel Overview, Explorer Panel Settings, and File Coloring.